ShareThis

Showing posts with label sponging. Show all posts

Sunday, July 22, 2012

Vampy gradient

I saw this gradient on Pinterest a couple weeks ago and absolutely fell in love with it.  I loved the dark vampy look of the black tips against the blood red.  The pin originated from http://www.lovevarnish.com/2012/06/vampy-gradient.html so credit goes to her for this awesomesauce mani.


This is 2 coats of Sally Hansen Right Said Red sponged with a combination of Sally Hansen Wine Not and Wet N Wild Black Creme.  Then I added just a teeny bit of sponging on the black tips with Orly Androgynie. 

This is a mani I can sink my teeth into.  I'd stake my life on it.

Hope you have a great day!


Sunday, July 8, 2012

Sparkly Summer Butterflies

Hi ladies, it's been in ill minute since one of us has posted, hasn't it? Well, Mama was in town for the week of the 4th so we were spending lots of time together. Hopefully you can't fault us for that :)

I wanted to sit down and do some nail art with some pizzazz this weekend, but OF COURSE I didn't know what color I wanted to use or what I wanted to do! So what did I do? Settle for one of my most FAVORITEST colors ever -- Zoya Jacy.

This color just makes me drool. It's vampy and berry all mixed into one and it's formula is awesomesauce and *le sigh* I just love it. Do you have it? No? Go get it. Now!

I used two coats of Jacy and topped with a coat of Revlon Quick Dry. I gotta tell you, I've given up on Seche Vite.  You see, I sat down and did this UBER sparkly mani Friday night... it was a light golden pink shimmer with a few coats of Teenage Dream, and it was AWESOME. But without fail, about ten minutes after I top-coated with SV, I experienced the worst tip shrinkage (giggity) that I've ever had. So I think I'll be giving some love to the other top coats I've neglected during my love affair with SV. Sorry SV, it's been real, it's been fun, but it hasn't been real fun. Peace Out.

ANYWAY! I sponged Zoya Faye on the tips for some nice sparkliezz. Then I used the little butterflies on Konad plate m78 and one of my Sally Hansen Chrome pens. Those things are AWESOME for stamping, and you can get them at the dollar store!

I finished up by adding some little microbeads with the butterflies. I think it looks kinda like a flight path!  Mama also got these at the dollar store during her visit. It's a little pack that comes with 8 colors. Pretty cool! I think they look nice, but boy they sure were a biatch to get on and I doubt they'll stay on long. I'll probably end up picking them off when I get my hands stuck in my hair.

Anyway, here are the pics :)


Hope you all have a great weekend!

Thursday, March 22, 2012

Really late Girl On Fire nails

Are you guys tired of seeing Hunger Games nails yet? I'm sure you are, but I decided to share mine with you guys anyway. Especially since it's been like 6 years between each of my posts... I figured I might as well get SOMETHING up for you :)


This was done by sponging orange and yellow all over then freehanding the black with acrylic paint. Pretty simple, but my flames look a little more ... abstract? than everyone else's. Haha.

Are you guys going to see the movie? I will be seeing it twice! My work is taking my department to go see it tomorrow (yes, really... I get PAID to see this movie...) and I'm also going with the BF on Sunday, as we made plans earlier to see it and he's looking forward to it too :)

Hope you all have a great weekend!

Friday, January 20, 2012

Springy Spongey Konad

Yes...I know it is January 20th. But we got about 3 inches of snow yesterday so I needed a spring pick me up.  I am hoping this winter won't last until like May since the first part of it was pretty tame :\


I started with a base of Sally Hansen Lavender Cloud, then sponged randomly on top of the white with China Glaze Lemon Fizz, China Glaze Peachy Keen, China Glaze Electric Pineapple and Essie French Affair. Add a coat of Fairy Dust (duh) and I stamped with the flowery butterfly plate (RA 102). I really need a better white stamping polish because this Sinful one does NOT show up opaque enough. But I kind of like the subtlety it gives it.


The end result is an overly spring mani that looks way out of place in this dreary wintery Indiana weather, but I don't care because it's pretty and I like it! :D

Hope everyone has a great weekend!

Tuesday, December 27, 2011

New Years Eve Mani - Gradient Stars

Hi all. I know I know, it's been a bit since one of us has posted. But the holidays are crazy busy and I just couldn't find time to do my nails or get any posts up! Sorry about that :)

Since Christmas is over, I have to start on my new holiday to create nail art for -- New Years! Even though I'll probably only get two designs in ;)

I started with a base of China Glaze Cheers To You. Then I sponged on China Glaze Skyscraper on the tips. A coat of China Glaze Fairy Dust (duh) and some hand painted and Konad stamped stars complete this look! Pretty easy really.


Did you all have a lovely Christmas? What was your favorite gift? I got the Naked palette! From my dad! That was a shocker! Hope you're all having a fabulous week.  We had our first snow of the year here in Indy! First snow of the year.... on December 27. Crazy!

Saturday, November 19, 2011

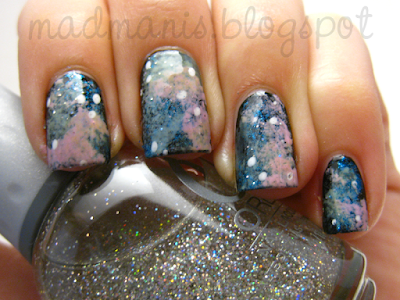
Day 19: Galaxy Nails

Galaxy nails! I've wanted to do these for a LONG time and now I had my chance! Yay!!


I started with a base of two coats of China Glaze Liquid Leather. Then I sponged on Orly Sweet Peacock, Sally Hansen Barracuda, Sally Hansen Pink Blink and a yellowy green Wet 'n Wild (can't remember the name right now).


After that, I made dots using Zoya Purity then used one coat of Orly Shine On, Crazy Diamond (obviously named by a hippie). Seal with a topcoat and you're good to go!


I am loving these galaxy nails and I am loving even more how EASY they were to do! Just a little bit of sponging, some tiny microglitter and you're done! I'll definitely have to try this again with some different colors because I looooove the way this turned out. I don't want to take this one off! :(

Do you guys like galaxy nails? Or are they too "out of this world" for you? BAZINGA!! I slay me :)

Wednesday, November 9, 2011

Day 9: Rainbow Nails

Day 9: Rainbow Nails!!

I am so excited about these puppies! I tried a rainbow mani a week or so ago when I sat down and tried to swatch several days, but it did not turn out well at ALL. I'm MUCH happier with this one!


This was actually so simple to do! I started with two coats of Sally Hansen Lavender Cloud. I dabbed each rainbow color onto a piece of paper and used a small paintbrush to draw lines about 3/4 up my nail. I did all of one color first so that my polish didn't get too dry while I was working.

Then I sponged a little more white over the top to obscure the tips of the lines a little bit. I used a white striper for the "rays of light" and a dotting tool for the stars. Finish with a coat of none other than China Glaze Fairy Dust and you're done!


Here are ALLLL the colors I used to make the rainbow gradient:


Sadly, stupid Seche shrunk this mani and it made me so sad. I tried to file down some of the shrinkage to make it less noticeable, and I think that helped... but SV, I am not pleased with you. Revlon is getting more attention now because you suck and ruin my hard work. >:[


So pleased with this one! I had hoped that would be the case -- I'm excited for this challenge because I will be doing things I don't normally do and expanding my horizons...yay!

Thursday, October 20, 2011

Simple Halloween Gravestones

Hi all! Today I have a Halloween design I've been wanting to do for a while -- little Halloween gravestones!


I started with a base of Ulta Little Black Dress to represent a spooky night sky. LBD is a black polish with small silver glitter in it. Here is a swatch:


Next I painted the gravestones with OPI French Quarter For Your Thoughts (the PERFECT gravestone color!). I just painted the gravestones straight with the polish brush. Paint like you would if you were doing a ruffian mani.

To make the gravestones look old and aged, I sponged a tiny bit of Sinful Colors Secret Admirer. I really like the way it made the gravestones look!

I used a small brush and black acrylic paint to draw on "RIP" on all of my nails.


Finish with some grass at the bottom (I used a green Sinful striper). Seal it with Seche Vite and voila! You're done :)


What do you ladies think of these simple gravestone nails? They were one of my most simple Halloween designs and they're at the top of my list! I guess intricate doesn't always mean better :)

Oh also, if you're arachnophobic, might want to turn away in 3...


2.......


1.....


I present to you, the rare Hoosier man-eating spider!

Happy almost weekend!

Saturday, September 10, 2011

Autumn Leaves Nails


Hi all! Fall has officially started for me. It's been about 60-65 degrees all week here in Indy! Let the autumn colors begin!!

I started off with three coats of Color Club Positively Posh. It's a nice dusky mid-brown color. Perfect for fall!


Then I took Pure Ice Fast Lane and sponged it over the brown in little lines. This is supposed to look like little tiny particles of dried leaves floating through the air. Please tell me you know what I'm talking about :)

I didn't have any stamping polishes that looked exactly the color of autumn leaves. What I did was alternate between using red and yellow Konad polish. I also used both colors on stamps sometimes to get a look of uneven color on the leaves. I think it worked pretty well, just wish the polish showed up a little brighter! I was a little disappointed with that, but oh well. Top with Seche Vite and voila! I still think these are very fall appropriate.. I'm digging them :)

When I was taking this picture, a maintenance guy from the apartment walked around into our backyard. He gave me a "WTF are you doing?" kinda look. Embarrassing.. I hate it when people see me taking nail pics!
Take care!

-Amanda

Monday, August 29, 2011

Retro neon stained glass

I used a base of Zoya Purity for this mani.  Purity is a really well pigmented white creme - it goes on smooth, it covers well and it dries relatively fast.

I took tiny bits of a cellulose sponge and sponged on various neon colors for the stained glass.  The colors I used were Studio M Neon Pink and Neon Greenlight, Sinful Colors Dream On (purple), and China Glaze Yellow Polka Dot Bikini and Sun Worshipper (orange). 
When the colors were dry I stamped over the top with Konad Special Black and BM plate 208.


I used a retro 60's style headband for my inspiration.  Groovy baby!


My mother would have referred to this as "loud".  Amanda called it "Fun!"  What do you think?

Friday, August 5, 2011

Take Two: Wedding French Manis

Hello all! We are starting a new series which we are calling Take Two . Each week, we will pick a different type/theme of mani and both do our takes on it. Then we will put them in a post together so you can see how similarly/differently we execute the same general type of design!

This week's topic is Wedding Appropriate French Manicures. A relative of ours is getting married and we needed something not too obnoxious to wear. Bright blue and neon green aren't really appropriate for weddings ;)

Melissa's Design:


I used a base of 10 Professional Pinky Promise. This was a little thin -- I had some cuticle pooling. I then sponged a white french onto the tips of my nails. Finished with a dotting tool and Sally Hansen Insta-Dry in Lightning and OPI Be A Dahlia Won't You.


Amanda's Design:


I know black is a little... "out there" to be considered wedding appropriate, but I tried to keep it tame/elegant at the same time. My dress is white and black so I thought a black-tipped french with lace accents could be pretty, but unique at the same time.

I started with three coats of China Glaze Innocence, a sheer baby pink. I have a love-hate relationship with this polish -- it applies fine, but it's so sheer that you can always see the yellow on my nails underneath. A perfect french mani color though. This is probably my most used China Glaze color! Here are some swatches of Innocence:


Then I made black french tips using Sinful Black polish. I always just freehand it -- I hate waiting for my polish to dry completely to use those little guides (same with tape) so I always opt to try myself. I gotta say, I've gotten better at freehanding french manis! My old attempts were futile. Then I used a small paintbrush and made little black loops and finished with little dots on top for the lace accent (can you tell that's what it's supposed to be? haha)


Sunday, July 17, 2011

Hawaiian T-Shirt


Aloha fellow nailaholics! I knew I wanted to sit down and do something fun with sponging today. This post is pic heavy!  :)

 I started with a base of Sally Hansen Coral Fever, which is a beautiful light.....coral. I know right? Who woulda thunk!?

Two coats of Coral Fever.
After, I sponged Sally Hansen Amazing Blaze and Sally Hansen Right Said Red (I'm...too sexy for my nails...) to create the gradient effect. I started off with an old crappy eyeshadow applicator but then found that these really cheap sponges we have work about 10x better!


Finally, I stamped with the Hawaiian looking flower pattern from BM221 and Konad white polish.


Pretty! In the sun!


I was going to use black but I'm so glad I stuck with white because I am loving this so much!! It looks like one of those cheesy Hawaiian shirts....


Eh? Eh?? Very summery, I think! This is one of my first successful sponging attempts and it came out nicely, so can I get a YAY ME!?

Hope everyone has a wonderful day,

-Amanda

Wednesday, June 22, 2011

Fourth Of July Series - Tie Dye


Hello! We've decided to do a series of nails for Fourth of July. We thought we'd start now as the holiday is about 2 weeks away and this gives us a chance to get out designs out before it comes around!

This one is *supposed* to look like tie dye, but I'm not sure I accomplished that goal. Oh well, it's colorful :)

I started with two coats of Sinful Snow Me White. I hate whites so much, by the way. Then I sponged Zoya Sooki (the most perfectest of perfect reds ever...) and China Glaze First Mate with an old eye shadow applicator. I drew the little lines on the tips with a white striper polish, and finished up with a coat of Revlon Belle.


-Amanda