I had intended to post a couple New Years manicures this week but have been slammed by the flu. I've been sick in bed for 3 days and Amanda is working so much in the post holiday shopping rush that she's been too tired to do her nails. Bear with us and we'll be back soon!!

Friday, December 30, 2011
Tuesday, December 27, 2011
New Years Eve Mani - Gradient Stars
Hi all. I know I know, it's been a bit since one of us has posted. But the holidays are crazy busy and I just couldn't find time to do my nails or get any posts up! Sorry about that :)
Since Christmas is over, I have to start on my new holiday to create nail art for -- New Years! Even though I'll probably only get two designs in ;)
I started with a base of China Glaze Cheers To You. Then I sponged on China Glaze Skyscraper on the tips. A coat of China Glaze Fairy Dust (duh) and some hand painted and Konad stamped stars complete this look! Pretty easy really.


Did you all have a lovely Christmas? What was your favorite gift? I got the Naked palette! From my dad! That was a shocker! Hope you're all having a fabulous week. We had our first snow of the year here in Indy! First snow of the year.... on December 27. Crazy!
Friday, December 23, 2011
Christmas Eve mani featuring Milani Gold
I have been feeling really uninspired lately regarding my manicures. After a couple days pondering it, I finally decided on this as my holiday manicure for Christmas Eve. I'm still undecided as to whether I'll remove it and do something different for Christmas Day or if I'll be too tired after all the festivities.

I wanted a yellow gold base instead of a white gold. Does that make sense? More of a true gold color. I only have a couple gold foils in my collection so that limits my choices. So for the base, I used one coat of Orly Glitz. It went on very smoothly and one coat was pigmented enough for the base I needed.

I wanted just a hint of holographic flash to poke out from underneath the glitter, so next I applied one coat of China Glaze Cleopatra. This is a clear base with gold and holographic microglitter. It's very sheer and the glitter is surprisingly sparse considering how saturated it looks in the bottle. If you were using this alone you'd need to build it with several coats.

The crowning glory was Milani Gold and I used 2 coats. This is from their Rock Star Heavy Glitter line and is a clear base just packed with large gold hex glitter. Very blingy. The formula is a little thick and I find I have glitter glob buildup around the neck of the jar if I'm not careful. You'll also need to use the 'push it around your nail' technique to distribute the glitter evenly. Be sure to wait for your base coat to dry before applying a second coat or you'll just end up moving around the glitter from your first coat!


And thank you to Amanda at Fashion Footing for awarding us the "Glitter in Their Veins" award for mastering the art of glitter nail polish. I definately am a glitter lover, but I'm not sure about my Amanda. She's a work in progress :) Btw have you noticed how many nail bloggers are named Amanda or Mandy?
Monday, December 19, 2011
Matte Party Hearty Glittery Goodness
Hi ladies. It's been a while since I've posted it seems -- I've been completely swamped with work. Working in retail around Christmas season is hell, I've learned. I have gained so much respect for people who like working retail because I clearly am just not cut out for it. I've been working pretty long shifts the past few times I've worked, and when I get home I'm so exhausted and irritated that the last thing I want to do is do my nails. The couch beckons.
On top of that, I had the stomach flu today. I woke up Sunday night/Monday morning with stomach cramps so bad I thought my appendix was rupturing! Bah, not fun. But don't worry, I am feeling better and have prepared a post for you girls. Yes, I will stop rambling :)
I wasn't really feeling up to doing any nail art tonight, but I still wanted to be festive. Sadly though, I don't have many greens and I've been doing reds all month it seems! So I settled on China Glaze Watermelon Rind. It's not exactly a Christmas green as it has kind of a blue undertone, but I actually think it turned out really nicely in this mani.


I had to use three coats of WR -- the formula was really watery and it kept flooding my cuticles. Drat! Then of course, I had to be festive and put on a coat of China Glaze Party Hearty. I sealed with a coat of Seche Vite....but something more needed to be added. But what!?
I decided to channel my inner Polished Perfectionist and mattify the glitter. Oh how I love this!! I have always liked matte nails but for some reason I always forget about my Matte Magic so I don't wear them nearly as often as I would like. I just can never think to use it!
I did notice that using a coat of SV before the MM seemed to make the matte look much better. Every other time I've used MM it looks a little streaky, but I think the Seche Vite did the trick.

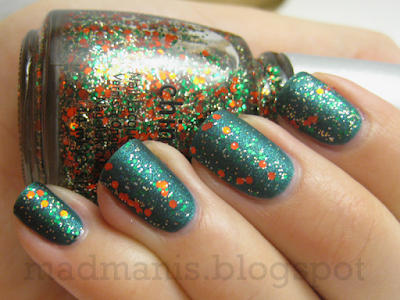

This is so simple and easy, but I am digging it! Festive and cheery, don't you think?!
Hope you're all having a wonderful Christmas week with friends and family, and remember, the best way to spread Christmas cheer is singing loud for all to hear!

On top of that, I had the stomach flu today. I woke up Sunday night/Monday morning with stomach cramps so bad I thought my appendix was rupturing! Bah, not fun. But don't worry, I am feeling better and have prepared a post for you girls. Yes, I will stop rambling :)
I wasn't really feeling up to doing any nail art tonight, but I still wanted to be festive. Sadly though, I don't have many greens and I've been doing reds all month it seems! So I settled on China Glaze Watermelon Rind. It's not exactly a Christmas green as it has kind of a blue undertone, but I actually think it turned out really nicely in this mani.


I had to use three coats of WR -- the formula was really watery and it kept flooding my cuticles. Drat! Then of course, I had to be festive and put on a coat of China Glaze Party Hearty. I sealed with a coat of Seche Vite....but something more needed to be added. But what!?
I decided to channel my inner Polished Perfectionist and mattify the glitter. Oh how I love this!! I have always liked matte nails but for some reason I always forget about my Matte Magic so I don't wear them nearly as often as I would like. I just can never think to use it!
I did notice that using a coat of SV before the MM seemed to make the matte look much better. Every other time I've used MM it looks a little streaky, but I think the Seche Vite did the trick.


This is so simple and easy, but I am digging it! Festive and cheery, don't you think?!
Hope you're all having a wonderful Christmas week with friends and family, and remember, the best way to spread Christmas cheer is singing loud for all to hear!
Saturday, December 17, 2011
Color Club Holiday Splendor
I think Amanda and I swatched this holiday line way back when in late October or early November but I haven't had a chance to wear it as a full mani until now. And I was really missing out because this is truly a spectacular color.
I used one coat of Color Club Perfect Molten as a base - it is a light green foil and you can find it under the Color Club tag on our blog. Then.. over the top I applied Holiday Splendor. It's pretty in the bottle but on the nail is where it really shines. My bottle is a little thick so I had to be careful with application (I left my thinner behind in the move, gotta pick up a new bottle)- but look at the holo goodness in this poilsh - oh my gosh! I have a feeling I'll be holding my hands up to the sunlight today to drink in the beauty of this one.
Some of the pictures are left intentionally blurry to show off the holographic glitter.


Wow. I love this one. I'm glad I wore it before the holidays were over. It reminds me of a Christmas wreath!
Thursday, December 15, 2011
It just wouldn't be the holidays..
without Elle's Spell.
We swatched this lovely earlier in the year but I had to share it again now that the holidays have rolled around.
I started with a base coat of Revlon Devil's Lure, which is one of my favorite dark vampy red (almost black) polishes. You can find it swatched on our blog.
Then I applied one coat of Barielle Elle's Spell, which is a gorgeous flakey in a sheer red base. You can use it on it's own without layering, but you'll need multiple coats to build the opacity. Behold - instant holiday cheer!
In sunlight..


And in shade..

Tuesday, December 13, 2011
Eyegasm: Holiday Glitterbomb
Hi guys! Today I have an AWESOME layering combo to show you guys!

I received Wet n Wild Rockin Rubies from Steph the other day as a Secret Santa present! Rockin Rubies is part of Wet n Wild's Ice Baby collection. She also sent me the pinkish purple one and the teal one as well as some other fun goodies which I will be showing you throughout this week!
I started with two coats of China Glaze Brownstone which is one of my most favorite colors from this entire year. It's a brownish reddish burgundy creme and I LOVE it. Then I used one coat of Rockin Rubies on top and....omg. It's pretty much awesomesauce. I recommend big-ulating these pics to see the sparkly goodness!

Rockin Rubies is a red microglitter with holographic particles in a sheer-ish red base. I LOVE how RR over Brownstone looks. If you look at swatches of RR on it's own, it looks a little.....dull, but here it just looks so amazing!
I stared at this ALL day at work on Sunday. The only bad thing about this is that it's a top coat sucker upper... I used two coats of Seche Vite and while it's pretty much smooth, it still dried to a duller finish than I'd anticipated. It looked AWESOME when the SV was still shiny but, ah well, it's still so shiny and sparkly and glitter-tastic!!

I can't wait to use the other two polishes I received! Hopefully I can come up with some equally awesome glitterbombs :)
Have a great day ladies! Happy Tuesday!

I received Wet n Wild Rockin Rubies from Steph the other day as a Secret Santa present! Rockin Rubies is part of Wet n Wild's Ice Baby collection. She also sent me the pinkish purple one and the teal one as well as some other fun goodies which I will be showing you throughout this week!
I started with two coats of China Glaze Brownstone which is one of my most favorite colors from this entire year. It's a brownish reddish burgundy creme and I LOVE it. Then I used one coat of Rockin Rubies on top and....omg. It's pretty much awesomesauce. I recommend big-ulating these pics to see the sparkly goodness!

Rockin Rubies is a red microglitter with holographic particles in a sheer-ish red base. I LOVE how RR over Brownstone looks. If you look at swatches of RR on it's own, it looks a little.....dull, but here it just looks so amazing!
 |
| In the shade! |
I stared at this ALL day at work on Sunday. The only bad thing about this is that it's a top coat sucker upper... I used two coats of Seche Vite and while it's pretty much smooth, it still dried to a duller finish than I'd anticipated. It looked AWESOME when the SV was still shiny but, ah well, it's still so shiny and sparkly and glitter-tastic!!

I can't wait to use the other two polishes I received! Hopefully I can come up with some equally awesome glitterbombs :)
Have a great day ladies! Happy Tuesday!
Sunday, December 11, 2011
Christmas Present Mani
Hi all. It would not be Christmas without a Christmas present mani so that's what I'm showing you today!

The base colors from L to R are: China Glaze Mistletoe Kisses, Wet n Wild Burgundy Frost, China Glaze Starboard and China Glaze Stroll. The bows were just made by mixing different acrylic paints and using a striper brush.
CURSE THIS MANI!! It chipped like none other and I have no idea why. I used Seche Vite on it. Burgundy Frost always chips on me in less than a day, but this entire thing went crazy after like one single day. Behold:

Oh well. It looked cute for the day that it lasted :)

Hope you all are doing well! See you later :)
Saturday, December 10, 2011
Simple snowman nailart
Admittedly, my nail art skills pale in comparison to Amanda's. These old(er) hands can't hold the paintbrush as steady as a 20something. ;-) But here is a cute design I saw on some holiday plates that I wanted to recreate on my nails.
I started with a base of OPI Alpine Snow matte. As usual with white polish, I had some minor issues with streakiness and patchiness necessitating 3-4 coats.
Then after the base was completely dry, I painted a stripe of black acrylic paint at the base of my nails for the hat then used a dotting tool for the eyes and a thin striper for the smile. The carrot nose is made with orange acrylic paint and a small nail art brush.
I first attempted this nail art with actual black polish, but found that it was too streaky and didn't cover well so I switched to acrylic paint.

 The ring finger snowman's smile has turned into a grimace. It looks like he has something to say...
I started with a base of OPI Alpine Snow matte. As usual with white polish, I had some minor issues with streakiness and patchiness necessitating 3-4 coats.
Then after the base was completely dry, I painted a stripe of black acrylic paint at the base of my nails for the hat then used a dotting tool for the eyes and a thin striper for the smile. The carrot nose is made with orange acrylic paint and a small nail art brush.
I first attempted this nail art with actual black polish, but found that it was too streaky and didn't cover well so I switched to acrylic paint.


Friday, December 9, 2011
Mad Manis in Scratch Magazine
Hi girls! We just have something exciting to tell you -- we were featured in December's issue of Scratch Magazine! They got our names backward, but oh, well :)
The article is below if you're interested :)

The article is below if you're interested :)

Thursday, December 8, 2011
Wintery Penguins Tutorial
Hey all! Here is a tutorial for my penguin nail art for those of you who are interested.


Ta-da! If you recreate this I would LOVE to see your version!


Ta-da! If you recreate this I would LOVE to see your version!
Wintery Penguins
What would winter be without adorable penguins! That's what I decided to do for today's post.

I started with a base of Zoya Jo and freehanded the penguins with acrylic paint. I like that they are peeking out from the side! I think it gives them a cool perspective.
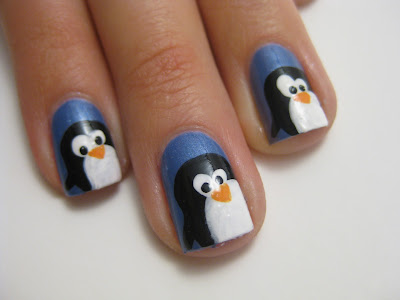
Not much to say about this one, but I love em! I also took pictures for a tutorial, so let me know below if you want to see that. What do you think of my little peng'inns? Have a great day!
Wednesday, December 7, 2011
A return to blogging and Christmas present nails
Hi everyone! I'm back! Thanks to Amanda for completely carrying the blog for almost the entire month of November while I was packing and making arrangements to move cross country from Indianapolis to Boston. I'm now (mostly) settled into my new place and can once again start paying attention to my nails.
My nails - ug. Any of you who have moved know how stressful it is on your nails. Packing and unpacking boxes not to mention lifting them. I think I've broken the corner off nearly every one of my nails in the last month, so I was forced to cut them down to Super Nubs and hope that they will grow back out by Christmas. My cuticles are weeping.
The drive was horrendous. Who would have thought that the blizzard we had to drive through would be in Indiana not Mass? We intended to drive 7 hours the first day and 9 the second, but the weather was so bad that we were over an hour behind schedule and had to stop an hour early just to get out of the storm. That made for a very long 12.5 hour drive on day 2 (counting some additional weather slow downs). Remember that scene in Star Wars where they make the drive to hyperspace? Try driving in that kind of weather for 6 straight hours. Case in point -

Yes, that is literally what our windshield looked like as we were pounded by a snow storm.
So 2 days later we arrived Boston. Most of my stuff arrived intact, minus the plate glass from my china cabinet that came broken in 2 pieces and my poor, poor light box.

So anyway, on to the mani..
I started with China Glaze Midnight Kiss, which is a sparkly gold foil. Then I stamped with Sally Hansen Insta-Dri in Rapid Red. I was really hoping for more of a contrast, but I'm happy with the more subtle way it turned out. It kinda looks like wrapping paper.


I actually prefer stamping my nails when they are shorter because the full nail designs fit better. Incidentally - I'm apparently out of practice with konad after taking a month off because I had to redo nearly all of the nails on my picture hand at least twice with the index finger taking 4 tries to get the stamp straight. ug. And then I guess I bumped it with an acetone soaked cotton square where the design is missing. Too much time off!
Friday, December 2, 2011
Christmas Mani -- Cute Santa
Hi all! I'm so excited to start Christmas manis EEE!! I played around with my nail wheels last night and came up with some cute ideas so I sat down and did this one for today. It's an adorable chunky Santa!

I started with two coats of China Glaze Starboard. This is an awesome Christmas green in my opinion. Maybe a little light, but it worked for this mani :) Here is a swatch of Starboard in case you've yet to see one....unlikely.

Then I painted all nails except for my middle fingers with China Glaze Party Hearty. I told you I was going to make up for lost time by using this all the time! I love it. It's just so festive!

Chunky Santa was made with acrylic paints and that's it. Pretty simple really. Voila!
Subscribe to:
Posts (Atom)