ShareThis

Showing posts with label Magnetic. Show all posts

Sunday, February 12, 2012

Icing magnetix blue

I'm sure by now you've seen this color swatched on other blogs so I'll say briefly I really like this color and I love the magnet that comes with these polishes - but my brush was SO wonky it almost made me not want to use this.  It was like trying to apply polish with a mop.  Horrible.

I've noticed with magnetic polishes that the design seems to muddy or become less defined after a couple days of wear.  So on this mani, I actually held the magnet over my nail for a full 60 seconds then immediately popped my nail under a nail dryer to try to set the nice crisp design.  And I think it helped!


Incidentally these pics were taken after 3 days so you can see a little bit of tip wear.  But it held up pretty well for an inexpensive polish!  This was 2 coats of color.  No complaints there!

Here is a pic of the brush.  Can you see where the bristles actually TWIST at the end? 


Hope you enjoyed today's post and have a great day everyone!

Wednesday, February 8, 2012

Pink Wednesday: A different take on magnetic polish

Hi ladies! Happy hump day! Almost to the weekend, what are your plans? My boyfriend is coming up for the weekend. He is still in school still -- I don't get to see him whenever I want, so I'm pretty excited :)


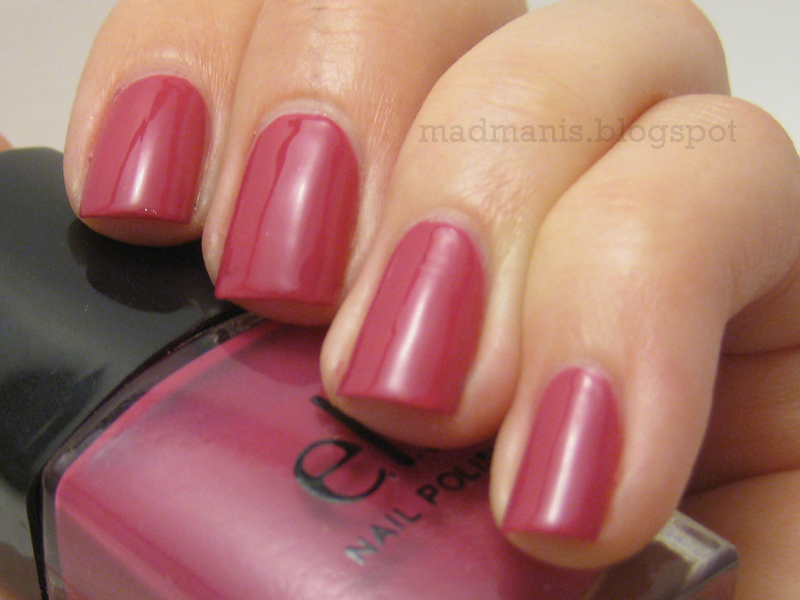
For this mani, I started with a base of two coats of e.l.f. Fuchsia. Such an original name, man....Fuchsia, for a fuchsia polish. These execs at e.l.f. are so deep and creative. All the other e.l.f. polishes I have are streaky and sheer, so imagine my surprise when this one was opaque in just two coats! The brush was wonky on it, but again... all my e.l.f. polish brushes are wonky and need hair cuts. I don't know why I love this color so much -- it's your regular, run of the mill magenta, fuchsia color. I don't know! I never used to like pinks either... I must be going soft in my old age.

Here are some swatches of Fuchsia by itself:


On day two, I wanted to freshen this mani up. It had gotten dull and I already had tip wear a day later. Mama sent me two Icing magnetics a few days ago that I decided to use on it. When I initially got the package, I played with the magnetics and could NOT get them to work for the life of me. It would only magnetize down the center of my nail. But, when I tried this time, I used thinner coats and it seemed to work a little better. I still need some practice with them though to get a harsher pattern to show up, I think.

Anyway, I just taped down the diagonal of my nails and painted on a coat of this gold magnetic polish from Icing. It has no name. Icing, y u no name awesome polishes?!

Finished up with a black line over top of the diagonals and voila! A simple Pink Wednesday mani that isn't your standard magnetic mani. Mom called it "interesting" ... I guess I can live with that.


Also, just a little note: I've added a requests/submit button on our Tumblr! So if there's any mani ideas, requests, questions, what have you.... send em there! :)

Wednesday, January 25, 2012

Icing magnetic pink Wednesday!

This was my first attempt with magnetic polish.  I picked up 3 of the 4 colors at Icing Saturday night and decided to start off with the pink one for Pink Wednesday!

I started with a base of Color Club Hot Like Lava, which is a beautiful color in and of itself.  I love this Foiled collection - the polishes apply well, dry fast and are very forgiving of brush strokes.

The Icing polish applies nicely as well, it isn't too thick or too thin; but it is in a smaller than average bottle with .33 oz of product rather than the usual .5.  The price was much more reasonable than most of the other magnetic polishes that have been marketed to date (but that may soon be changing as more companies jump on the magnetic polish bandwagon).  I paid $9 for one bottle, but Icing was having a BOGO half off sale so the second polish rang up at $4.50.  That's $6.75 per bottle. (I are a math whiz)

The polish comes with a removable cap containing the magnet, so you dont have to flip your brush upside down to magnetize the design.  The magnet also contains little finger ledges to help with holding the magnet the correct distance from your nail without it coming in contact with it.  Well -- in theory anyway.  I actually had to redo 5 nails because I got a tiny bit too close and bumped the magnet into my wet polish.  So there is an initial learning curve.


And here is the lovely Hot Like Lava on it's own


Noobie tips

1) Do only one nail at a time, you want to magnetize the polish while it's still wet.

2) Hold the magnet stationery.  I was under the misguided notion that since I have wide nail beds if I kinda slowly pivoted the magnet from one side to the other I'd get a more uniform design.  Untrue.   Your best design comes from holding the magnet absolutely still.

3)  I found that the best way to judge the distance from my nail bed to the magnet was to hold my finger under a bright light and look down from the free edge toward my cuticles rather than a side or lateral view.  (see pics for example)


Yes

No

4) Base color (at least on the polishes I have tried) does not seem to impact your finished product much.  I swatched on 4 different base colors and my design came out pretty much identical on all 4 swatches.

This is such a different concept to me and I like it a lot more than I thought I would.  I think the phrase I used while I was working on this mani was "freaking awesome"!  hehe  Also the color variations don't show up as well in bright light (i.e. light box) than in normal ambient lighting so your design is going to be more pronounced than it looks here.