ShareThis

Showing posts with label Orly. Show all posts

Monday, August 6, 2012

Harlequin Hardware manicure

You may or may not have seen this mani floating around the internet a lot lately - its a mani first introduced by CND at the Diego Binetti show during NYFW.  Ivana did a lovely version of it HERE

So here's my version of it using 2 coats of Sally Hansen Shell We Dance as the base then lightly sponging on Orly Oh Cabana Boy around the cuticles.   I suggest you protect the skin around your nails with tape ala water marbling or be  prepared for extensive cleanup.  You WILL have pink fingers! ;-)

To finish off I freehanded a french tip with Essie Good as Gold.  Lemmetellya - this polish wears like IRON!  I wore this mani for 5 days and still had no tip wear on the Essie metallic.  Good stuff!


Have a lovely week!

Friday, August 3, 2012

Girly giraffes

I love giraffes.  They have a special meaning to Amanda and I, and I have really been wanting to do another giraffe manicure.  I did a freehand giraffe here.  But it seems everyone and their brother have been doing a giraffe stamp with the new BM set and I didn't want to regurgitate the same design again.

So, I decided to change it up a little bit and do a girly giraffe with Orly Passion Fruit and yellow Konad stamping polish.  It's subtle but I really like it!

Thank God it's Friday!


Sunday, July 29, 2012

Fairy butterfly wings

I have been wanting to do a manicure inspired by my tattoo for a few weeks now, but never really had enough time to implement the design.  This is my interpretation of fairy butterly wings.

I started with a 2 coats of Sally Hansen Green Tea, which is a dusty light mint color.  Green Tea is a finicky polish and doesn't like to be overworked, or it can become patchy and streaky.  Then I lightly sponged Sally Hansen Insta-Dri  Blue Away and Orly Charged Up over the top of Green Tea and let that dry thoroughly.  I then finished the design off with a black striping polish, Wet N Wild black creme and a small paintbrush; and Zoya Purity and some dotting tools.  Purity is my favorite white polish because it is so opaque.  I'm about half way through my bottle and had to thin it down a little today with some Nail Polish Thinner.  When everything was dry I top coated with SV, because I wanted it to dry super fast so I didn't ding it.  It would be a shame to do all that work and have to redo it because of a dent! 

What do you think of my take on fairy wings?


And just for fun here's a pic of my inspiration - this is the tattoo I got about 3 years ago and is my first and only tattoo.  (I'd like to get another tho!)  I wanted to incorporate my love of fairies (I collect them!) with a more mature tattoo.


Hope you're having a lovely weekend!

Sunday, July 22, 2012

Vampy gradient

I saw this gradient on Pinterest a couple weeks ago and absolutely fell in love with it.  I loved the dark vampy look of the black tips against the blood red.  The pin originated from http://www.lovevarnish.com/2012/06/vampy-gradient.html so credit goes to her for this awesomesauce mani.


This is 2 coats of Sally Hansen Right Said Red sponged with a combination of Sally Hansen Wine Not and Wet N Wild Black Creme.  Then I added just a teeny bit of sponging on the black tips with Orly Androgynie. 

This is a mani I can sink my teeth into.  I'd stake my life on it.

Hope you have a great day!


Wednesday, June 20, 2012

Welcome Summer!

This is a manicure I did over the weekend because I wanted something with a little ZING to really shine in the sunlight.  We haven't had many summery days here in Boston - I actually find myself missing those 90 degree days from Indiana!  Oh - and it's supposed to be 97F today here in Boston.  Wish I could go to the beach instead of work!!

I started with a base of Zoya Charisma, which is a beautiful neon magenta color. The pictures make it look pink, but it's actually a deeper red violet color.   Charisma is lovely on her own and will be featured again in an upcoming mani I have planned.  Over the top of Charisma I applied 2 full coats of Orly Bubbly Bombshell.

OBB is a clear base packed full of small magenta colored glitter.  Take her out into the sunshine and she burns your retinas with her glow!  The depth of this glitter is really unique too.  Bubbly Bombshell has been sitting in my stash unused for months and I'm glad I finally took her for a test drive!


Tuesday, May 8, 2012

Orly Space Cadet

This post is not about a new polish or fancy nail art.  It's simply showcasing one of my favorite duochrome polishes - Orly Space Cadet.

I woke up Monday morning in the mood to wear a duochrome and went straight to this one.  Space Cadet is a shimmery golden pink in a green base.  As you already know or might have guessed, it's color shifts from golden pink to olive green on the nail.  Space Cadet is a bottle of spectacular smooth, sparkly goodness.  The color can be somewhat sheer but is buildable, so I used 3 coats for my pictures today. 

I tried to capture the different color flashes of this little gem.  Now my next question is, should I leave as-is or konad over it?


Sunday, March 18, 2012

Nail Art: Polka Dot Birdies

What's this?! Amanda's actually posting something?! I'm just as surprised as you are! Still trying to find the time to keep up with the blog in my new schedule, but I think I'm getting better at it. And I'm learning some neat things at work that I can incorporate into the blog too!


I don't know what it is about me and bird nail art, because this is the second or third time I've done something with birds. I just think the images that I look off of are so cute and they translate really well into nail art. But oh well, because I think it came out pretty well. I only wish I'd used acrylic paints instead of polishes. I didn't want to take the time to mix out the colors in acrylic paint. You'd think after whipping my butt in to shape for a 40 hour week my laziness would be gone....but nope! ^_^

The base of this is Orly Pure Porcelain. It's a good off white color, but the color is a little streaky so I find myself having to use pretty thick coats. Then I just freehanded the birdies and polka dots on with polish :)


Hope you all had a great weekend. The bf and I went to the Black Keys concert in downtown Indy on Friday night, and it was AWESOME. They throw a really great show, so I'd definitely recommend any of you guys that like them to go in the future. :)


Thursday, February 23, 2012

Orly Passion Fruit fauxnad

Happy Pink Wednesday everyone (this post was supposed to go up yesterday but Amanda and I had a scheduling conflict!  sorry about that!)

I know you're thinking to yourself - that doesn't look pink.  But the camera is playing tricks on your eyes.  May I introduce Orly Passion Fruit, which is a bright neon coral jelly.  It actually looks more pink in the bottle than the nail - once you get it on, it leans a little more orange.

Passion Fruit applied very nicely and dried fast.  I didn't have any issues with streaking, dragging or cuticle pooling.  I initially was going to do 2 coats, but realized I still had VNL so I went ahead and added a third coat.  As I mentioned, Passion Fruit dries with a jelly type finish so I topped it with SV for some shine. 


I decided today was the day I wanted to try out my Color Club Copy Coats scented topcoats.  I used the pink one - named Mimic - because I have read elsewhere that these topcoats; although only slightly tinted, can cause mimimal color shifts in your base color.  I have to say that I really enjoyed the scent of Mimic.  I can't comment on what perfume it smells like, because I'm not a perfume connoisseur, but the company information says it contains blackberry, damask rose and sandalwood.  I was sniffing my nails all evening.   And I love the bottles - little squat square bottles with colored scented goodness in them!


This morning I applied a fauxnad over the base color using plate M72 and a Sally Hansen gold chrome pen.  I love these for stamping - great pigmented color!


What do you think of this fauxnad?  I've been really uninspired lately but I'm really liking this one!

Saturday, February 11, 2012

Valentine half moons

I don't know what to call this manicure.  It's not really a half moon because it's shaped like a heart.  Maybe a heart shaped reverse french?  I saw this on Illamasqua's website a long time ago and wanted to recreate it.  Sadly, mine did not come out nearly as pretty as that one.

I started with a base of Orly Pure Porcelain.  PP is sheer, and I needed multiple coats to get it opaque and it's the only off-white shade I own.  Then I used red acrylic paint to draw in the heart shape as a pattern because I was afraid I wouldn't be able to get sharp enough lines with polish without some sort of guideline.  Then I applied Zoya Carrie Ann over the acrylic paint and decided to top it with OPI Excuse Moi.  BTW - Carrie Ann is one of my FAV red polishes - it's a sparkly shimmery red that goes on like a dream.  The glitter from Excuse Moi blends in with the base color of CA so it's not terribly noticeable, and I didn't want to put numerous coats on so I settled for one.

Way too many coats on this one.  I'm waiting for my mani to just fall off from the sheer amount of product on my nails.  It's very Valentine-y and sparkly and I like it; but I'm dreading the day I have to remove it! ;-)


Tuesday, February 7, 2012

Heart Vines Nails

This is a mani I did based off of an image I found on ShutterStock. The image was of various hearts hanging off of a sort of branch or tree.


For this mani, I used a base of Orly Pure Porcelain. Pore Porcelain is a great neutral that's opaque in just two coats. It's a good alternative if you don't want to use a stark white background as a base for a nail art design. It's simple, but it's one of my favorite neutral colors in my stash.

The branches, hearts and dots were all made with black and red acrylic paint (what else?). I really like the end result of this mani and it wasn't too terribly hard to reach it! If you have the patience, this is an easy mani to pull off.


Happy Tuesday, hope you're all having a good day so far :)

Friday, February 3, 2012

Sally Hansen Feelin' Saucy fauxnad

So this color combination was inspired by my calender today.  It's a picture of a kitten playing with 4 balls of yarn - magenta, yellow, blue and red.  Unusual colors to use together but somehow they just worked! 

I started with a base of Sally Hansen CSM in Feelin' Saucy, which is a gorgeous magenta color.  I don't know why I don't wear this color more often, when I applied it, I really liked it.  My bottle is a tad thin so I had to take care not to flood my cuticles.  It levels well, dries fast and is well pigmented.  I used 2 coats for opacity.

When my base was dry, I lightly sponged Sally Hansen Insta-Dri in Lightening (sic) and Sally Hansen CSM in Right Said Fred and topped with 2 coats of Orly Shine On Crazy Diamond to give it just a touch of a holographic shimmer.  Then I stamped with a geometric pattern from Red Angel plate 114 and Konad special blue polish.  BTW - does anyone have any suggestions for a well pigmented medium blue stamping polish other than Konad?

This design somehow reminds me of the Autobot and Decepticon symbols from Transformers.


And here's a pic of Feelin' Saucy by herself.


Thanks for reading and have a great day!

Monday, January 23, 2012

Icing glitters - part 1

Before Christmas, I found these glitter polishes at Icing and they were so unique I went ahead and picked them up.  It's taken me this long to get them swatched for you.  I bought 4 and am going to be dividing the swatches up into 2 posts.

Today I have Disco Ball and Party Confetti

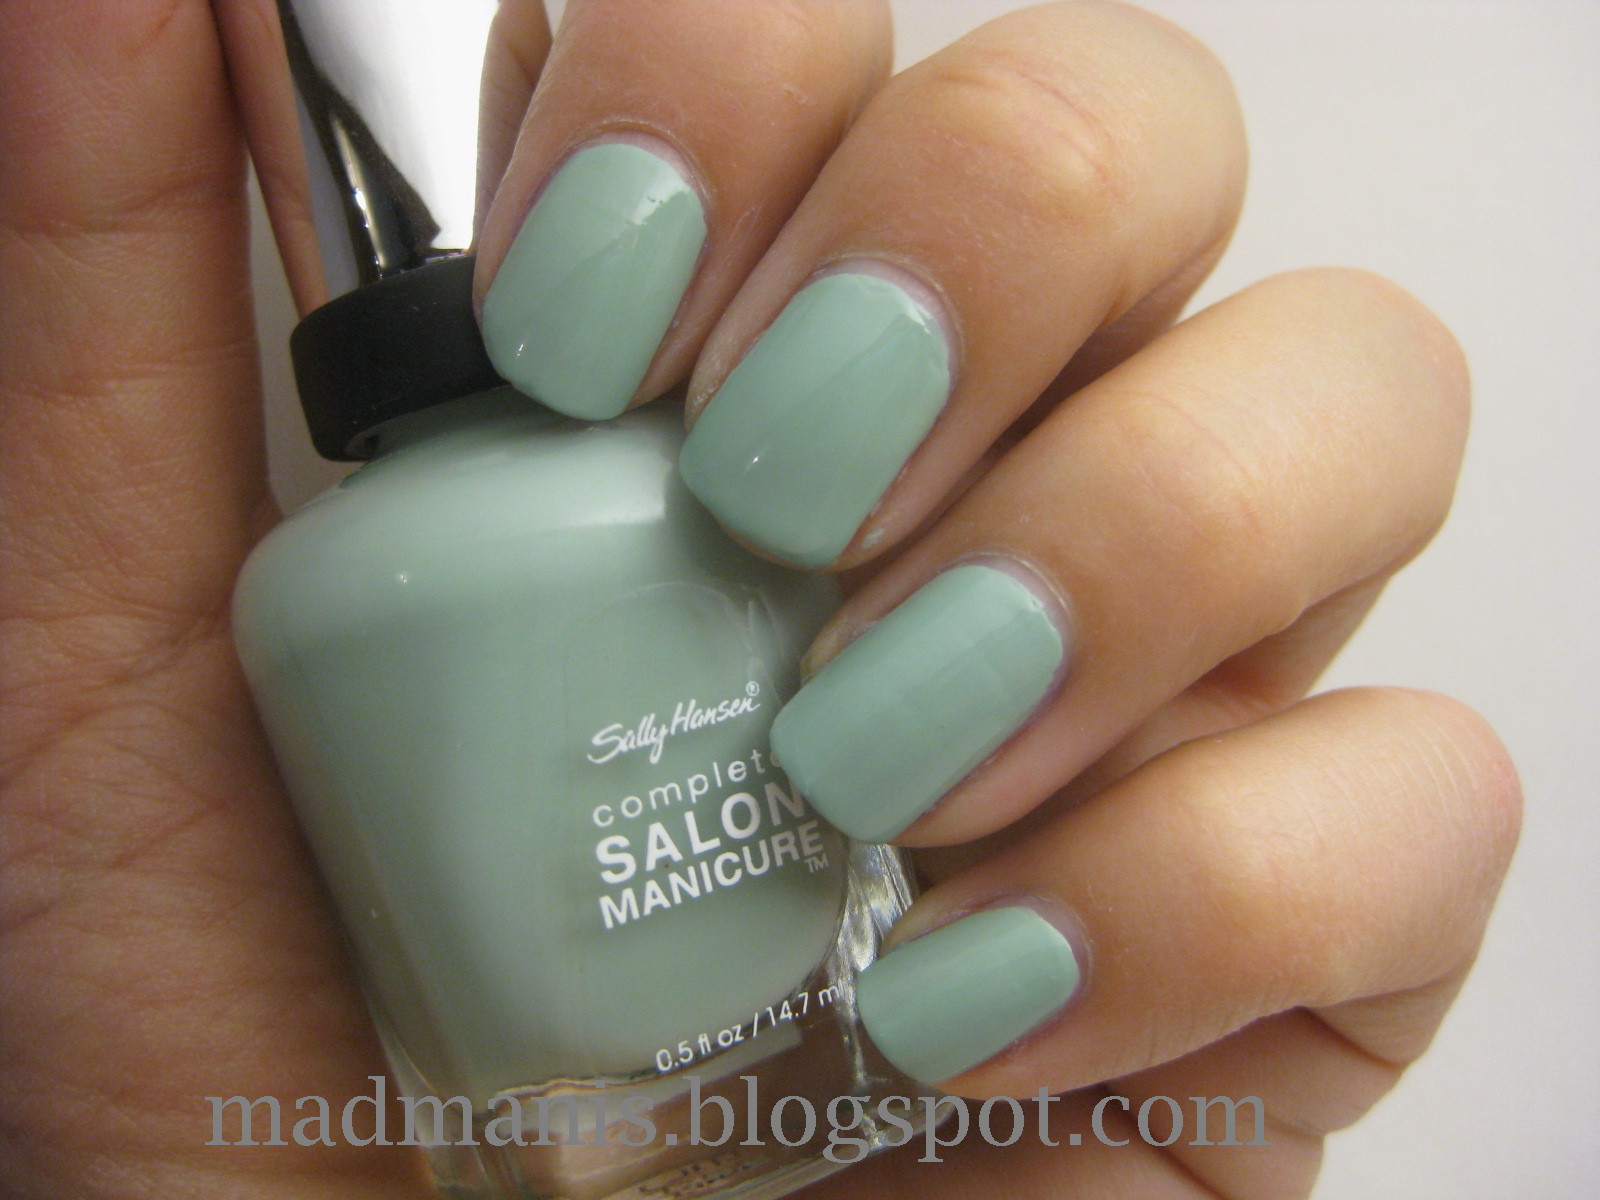
Sally Hansen Green Tea and Disco Ball -   I would describe Green Tea as a dusky light green color.  Like a mint but with a more greyish cast to it.  I had high hopes for Green Tea, but sadly - I did have some application issues with it.  My bottle was very thin and watery, so I had to be mindful of how much polish I loaded on my brush.  Also, as I suspected, the first coat was very streaky - which mostly evened out on the second coat.  I did have one nail that required three coats because even with 2, I didn't get opaque coverage.  I do however, love Sally Hansen's brush.  It is just perfect for the shape of my nails and the tapered or rounded end gives me a cleaner cuticle line.

I've layered Icing Disco Ball over Green Tea in these photos.  Disco Ball appears to be a clear base with small and large hex blue glitter particles.  As you can see in the photos though, the base color has now taken on a decidedly blue tint so the base must have just a hint of blue in it.  As with many glitter polishes, the base on these was very thick and goopy, making it difficult for uniform coverage with the glitter.  You may have to resort to placing the large hex glitters individually (like I did) with an orange stick or toothpick.


And here is Green Tea all by itself


Orly Purple Crush and Party Confetti - I think I made a poor choice on the base color with this one.  As Purple Crush is a neon (and cameras tend to freak out at trying to photograph neons), the pictures lost a lot of the depth that this color combination really had.  You can find Purple Crush swatched under the Orly tag elsewhere on our blog.  Party Confetti is a clear base with small and large fuschia hex glitter and a sprinkling of large purple hex glitter.  Again - same problem with application - it's difficult to get the glitter to spread evenly and some of the larger hex glitters have to be coaxed from the bottle with an orange stick.


In conclusion here is my unofficial review of these Icing glitters -

Pros

Unique color combinations; if you are a glitter nail polish fan you will like these
Price (I paid $4.50 per bottle)

Cons

Application (difficult to get large glitters out of bottle)
Cleanup - I had glitter everywhere when trying to remove these

Watch for part 2 later in the weekend with the remaining Icing glitter polishes!

Saturday, January 14, 2012

Orly Orange Punch leopard

Any one that knows me knows I'm a big football fan.  And since my team unfortunately had a dreadful year, I had to go with a surrogate team for the playoffs.  :)  I know that the Denver Broncos have been in the news a lot because of Tim Tebow, but I find it refreshing to have a good positive role model for kids; not some gun toting, girlfriend beating thug.  So here's my nod to the NFL playoffs with my Denver Broncos leopard print.


The base is Orly Orange Punch, which applied like an absolute dream.  Smooth with good opacity for a creme/jelly.  One coat gave pretty good coverage, but I am a creature of habit and applied a second.  Then i stamped over it with konad plate 57 and special polish in blue, and dotted the spots with white acrylic paint.

As Amanda says... "Rawr"


I'll always be a Colts fan though.  You can take the girl out of Indiana, but you can't take Indiana out of the girl :)

Friday, December 23, 2011

Christmas Eve mani featuring Milani Gold

I have been feeling really uninspired lately regarding my manicures.  After a couple days pondering it, I finally decided on this as my holiday manicure for Christmas Eve.  I'm still undecided as to whether I'll remove it and do something different for Christmas Day or if I'll be too tired after all the festivities.


I wanted a yellow gold base instead of a white gold.  Does that make sense?  More of a true gold color.  I only have a couple gold foils in my collection so that limits my choices.  So for the base, I used one coat of Orly Glitz.   It went on very smoothly and one coat was pigmented enough for the base I needed. 


I wanted just a hint of holographic flash to poke out from underneath the glitter, so next I applied one coat of China Glaze Cleopatra.  This is a clear base with gold and holographic microglitter.  It's very sheer and the glitter is surprisingly sparse considering how saturated it looks in the bottle.  If you were using this alone you'd need to build it with several coats.


The crowning glory was Milani Gold and I used 2 coats. This is from their Rock Star Heavy Glitter line and is a clear base just packed with large gold hex glitter.  Very blingy.  The formula is a little thick and I find I have glitter glob buildup around the neck of the jar if I'm not careful.  You'll also need to use the 'push it around your nail' technique to distribute the glitter evenly.  Be sure to wait for your base coat to dry before applying a second coat or you'll just end up moving around the glitter from your first coat!


And thank you to Amanda at Fashion Footing for awarding us the "Glitter in Their Veins" award for mastering the art of glitter nail polish.  I definately am a glitter lover, but I'm not sure about my Amanda.  She's a work in progress :)  Btw have you noticed how many nail bloggers are named Amanda or Mandy?