ShareThis

Tuesday, July 31, 2012

Golden hearts

Today's manicure started out with a base of one of my most favorite red polishes - Zoya Carrie Ann.  It's a sparkly fire engine red and it just flows over the nail like a dream.  I used two coats for the base and let it dry thoroughly before I stamped it.

I told myself I wasn't going to pick up the Essie mirrored metallics.  One - because I tend to not like Essie's formula, and two - because I thought I had dupes of most of the colors in my stash.  (By the way, my boyfriend says I shouldn't call it a "stash" because it's way too big.  I should call it a 'hoard' instead - LOL)  I saw some of this line being used to stamp with though, I changed my mind and picked up 4 of the 5 colors available.  Bad me.  Bad.  I need to put myself on a makeup/nail polish purchase moratorium.   

Anyway, my first experience stamping with Essie Good as Gold was successful and here is the result. The stamp is BM 317 from their 2012 release.   Oh, and on the thumb I added some sparkle with Milani Red Sparkle One Coat Glitter.  I really love this glitter, but my bottle is half gone and it's starting to thicken a little.  Might be time to look for a backup bottle.  Let's face it - I just love red polish!


Well, I'm off to work for what's sure to be a brutal 'last day of the month' Tuesday.  Have a good one everyone!


Sunday, July 29, 2012

Fairy butterfly wings

I have been wanting to do a manicure inspired by my tattoo for a few weeks now, but never really had enough time to implement the design.  This is my interpretation of fairy butterly wings.

I started with a 2 coats of Sally Hansen Green Tea, which is a dusty light mint color.  Green Tea is a finicky polish and doesn't like to be overworked, or it can become patchy and streaky.  Then I lightly sponged Sally Hansen Insta-Dri  Blue Away and Orly Charged Up over the top of Green Tea and let that dry thoroughly.  I then finished the design off with a black striping polish, Wet N Wild black creme and a small paintbrush; and Zoya Purity and some dotting tools.  Purity is my favorite white polish because it is so opaque.  I'm about half way through my bottle and had to thin it down a little today with some Nail Polish Thinner.  When everything was dry I top coated with SV, because I wanted it to dry super fast so I didn't ding it.  It would be a shame to do all that work and have to redo it because of a dent! 

What do you think of my take on fairy wings?


And just for fun here's a pic of my inspiration - this is the tattoo I got about 3 years ago and is my first and only tattoo.  (I'd like to get another tho!)  I wanted to incorporate my love of fairies (I collect them!) with a more mature tattoo.


Hope you're having a lovely weekend!

Friday, July 27, 2012

60s inspired fauxnad

My original plan was to make this manicure a gradient, but I ran out of time and the colors I picked didn't really work too well together.  So I ended up stamping over it.

This is 2 coats of OPI Did it on 'em and BM plate 322 stamped with Black Konad special polish.  Very 60s eh baby?  shagadelic!


And here's the lovely OPI Did it on Em by herself - one of my FAV colors!


And now a question I pose to our readers (if you still are actually reading).  Amanda and I have been experimenting a lot with different makeup looks and are toying with the idea of starting a beauty blog.  I'm in my late 40s though with partially hooded lids which might be a turnoff to some people.

Would you be interested in seeing different makeup looks and reviews from both a younger and a more mature perspective?  Please vote at the bottom of the page !

Monday, July 23, 2012

Naked Neon Nails - Funky French


On Saturday I realized I've been a failure at summer manis - I haven't used ANY neons this whole summer! So I decided - TODAY'S the day. But alas... I had my heart set on a mani with a nude polish. What was I do to?

A funky french of course! With NEON tips! The best of both worlds - nudes, and neons! Plus, this way, it wouldn't be SO obnoxiously neon that people would see me coming from 50 feet away.

I started with two coats of Essie Topless and Barefoot aka the best nude polish in my whole stash (thanks Mom!). It's not quite mannequin hands, but it's just the perfect subtle skin color. I love it, but the formula on it is atrocious (in my bottle at least..). I managed to make it work and figured it wouldn't be too big of a deal if it wasn't perfect since I'd be putting something over it.

Now - to go on my hunt for the neon polishes I wanted to use. I realize not all of these are neon per se, but I thought this combination of colors was the most flattering together. The neons are (from thumb to pinky) China Glaze Pink Voltage, China Glaze Style Wars, China Glaze Electric Pineapple, Funky Fingers 220 Volts, and Funky Fingers Riot.


I did the nude base on Saturday afternoon, then applied tape to the tips for the french on Sunday. This works better for me than waiting [im]patiently for my top coat to dry enough to do it all in one sitting -- that's how I always ruin them, so I wait a day in between. Seal with a coat of Revlon Quick Dry and you're done! Probably the easiest nail art mani I've done in a while and I actually am really digging this one!


Oh, and before I go, look what managed to play out when I was taking pictures of this mani...


I swear I did not realize the matchy matchy until I was outside taking the pictures! Maybe my subconscious grabbed inspiration from what I was wearing ;)

Sunday, July 22, 2012

Vampy gradient

I saw this gradient on Pinterest a couple weeks ago and absolutely fell in love with it.  I loved the dark vampy look of the black tips against the blood red.  The pin originated from http://www.lovevarnish.com/2012/06/vampy-gradient.html so credit goes to her for this awesomesauce mani.


This is 2 coats of Sally Hansen Right Said Red sponged with a combination of Sally Hansen Wine Not and Wet N Wild Black Creme.  Then I added just a teeny bit of sponging on the black tips with Orly Androgynie. 

This is a mani I can sink my teeth into.  I'd stake my life on it.

Hope you have a great day!


Saturday, July 21, 2012

Pink checkerboard

After a failed manicure earlier in the week I wanted something simple and fast.  So I did a quick mani yesterday morning with Zoya Lolly, a lovely pink matte color.   I chose the matte polish because I wanted to do my nails in the morning before work and matte polish dries fast.  The first coat drags a tiny, bit but everything should level out by coat #2.

As I was showing my boyfriend the color he mentioned it would be cool if you could do a french tip fauxnad (of course he didn't know that there WAS such a thing!)  So at his suggestion, I added a checkerboard fauxnad tip using white konad special polish and plate M56.  It took me a couple tries to get the tips straight and even then the stamp didn't transfer perfectly.  But I think it looks cool.


Friday, July 20, 2012

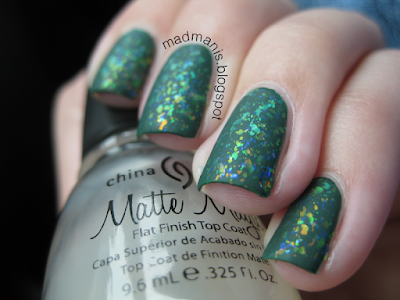
Extreme Matte Flakey Goodness

Guys...I might have gone overboard on pictures with this one. It's just so....pretty...and sparkly...!!

You know how I feel about doing nail art after nail art after nail art. I just don't like it -- I like to have something plain(ish) between manis. So this was my solution to "plain mani" -- three coats of a flakey polish over a dark green! Most people would just pick a light pink if they were going for "plain"....

Anyway, I started with two coats of Finger Paints Scenery Greenery. It's a pretty dark forest green, but man my bottle has gotten thick :( I hate it when you open a bottle of polish after not using it for a while only to find that it's practically chunkified. I topped that with two coats of Finger Paints Twisted which...OMG. I guess I never got the full effect of this polish because I've only ever used it over light colors. But over this dark green?! Wow!


Then I just had to see what it looked like mattified because I LOVE the look of matte flakies. And yes....I may have put on a matte top coat and taken pictures of it in my car on my lunch break....


What do you guys think of my mattified flakey mani? Love it or hate it? I happen to LOVE the way this came out!

Who's ready for the weekend? I AM I AM! Friday, Friday, gotta get down on Friday...

Monday, July 16, 2012

I-Don't-Know-What-This-Stamp-Even-Is Konad Gradient Nails

Hi ladies! Hope you all had a fabulous weekend. They go way too fast, don't they? :(

I wanted to try and see if I could do a more successful gradient, so this weekend I sat down and tried the Sammy technique and what do you know -- it actually worked!! I do have to say though, that I tried to do it with 3 colors at first and couldn't get it to look like an even, gradual gradient. So if anyone has any tips on that besides the usual just sponging two colors, one on top of the next method, let me know.

The two colors in the gradient are Sally Hansen Lavender Cloud and Essie Knockout Pout. I thought I got pictures of the plain gradient, but alas, I didn't. And I didn't realize until I'd already stamped and taken pictures of the final mani. Shucks.

I topped the gradient with a coat of Fairy Dust (my bottle is about as thick as Elmer's glue these days...) and stamped over with Sinful black polish and plate RA-112. I don't even KNOW what this pattern is supposed to be, so I don't know what to call these nails! Anyone have any ideas for what the pattern actually IS? Haha. Oh well, they turned out pretty well I think. Maybe I'm getting back into the groove of things!

Konad gradient nail art

Konad gradient nail art

Konad gradient nail art


Think I'm going to head over to Ulta today to pick up some CG On Safari polishes, so look out for some manis with those! Have a lovely day :)

Sunday, July 15, 2012

White ink tattoo

I don't know why, but lately I've been a little obsessed with white ink tattoos.  I like how they are so very subtle and almost look like your skin is made of lace.  So I wanted to try to recreate that look on my nails.

This is two coats of Sally Hansen Without a Stitch stamped with white konad special polish and plate m73, which I thought looked most like an intricate filigree type pattern that a tattoo would have.  Without a Stitch can have a tendency to drag, so you will need to apply smooth coats and let them dry thoroughly in between.   I'm quite pleased with how it turned out and I think it has the sublte look I was striving for.


I also just got back from the beach where I saw a sand sculpting festival.  Here are a few pics!


Enjoy the rest of your weekend!


Saturday, July 14, 2012

Mermaid cocktail

Here is another experiment I did with the cocktail mani.  I started with 2 coats of Orly Haley's Comet (which is a dupe for Zoya Charla and OPI Catch me in your net).  On the thumb, index and middle fingers I added 2 coats of Deborah Lippman Across the Universe (which is one of my all time favorite glitter polishes).  Across the Universe is a blue base with blue, green and silver hex shaped glitter.  It always reminds me of mermaid scales or the mosaic bottom of a swimming pool.

Sadly, the HC had a huge chip in it by day 2 - nearly half the polish came off in one piece.  And upon removal I found that this polish gave me terrible Smurf fingers, even with a basecoat.  Thank goodness most of it came off during a good scrubbing with whitening toothpaste and a nail brush.


Friday, July 13, 2012

Cherry Gingham Nails

Hi girls, I saw this design and just HAD to recreate it on my nails!


For this mani, I started with a base of Essie French Affair. I might need to repurchase this soon, I use it so often...

I then stamped over it with Konad plate m64 and a pink chrome Sally Hansen pen. The only bad thing about these pens is they give me all these little stamping wispies that I have to flatten out on my nail. I don't really know what else to call them, so I hope you know what I'm talking about. Hahah.


I made the cherries with acrylic paint and a small paintbrush. I think they turned out nicely, I only wish I had stamped with a lighter background color because I think it makes the cherries a bit difficult to see. But oh well! I'm a little out of practice, so hopefully these weekly nail nights with Mama will get me back into the routine :)


Just a brief post tonight because I'm on my way to visit the manfriend. And I am a little buzzed. Ok Bye!

Thursday, July 12, 2012

Dino Spots!

I have recently returned from a trip to Indiana where Amanda and I got to spend 5 days together including a fun pool party at a family member's house for the 4th of July.  I got a fabulous haircut from my cousin, Marcia; and she was kind enough to send me a care package of some high end hair products in the mail last night.  So here's a shoutout to my awesome cuz!

I picked up Zoya Trixie several weeks ago at Ulta and have been wanting to use it since then but couldn't figure out what I wanted to do with it.  So as I was looking through my folder of nail stamps last night my eyes fell upon the dino spots design and I thought the contrast of black spots would look good with the silver polish.

As Amanda and I sat down to do our nails together over Skype, I highlighted a few of the spots with Zoya Charisma and Studio M neon green.  I'm wondering if I should have just left the spots all black.  Neons are notoriously sheer and I knew it would take more than one coat to cover the black.   It's kinda cool looking though - looks like nail stickers!

Trixie went on just beautifully.  Zoya rarely lets me down in the quality of their product.  I used two smooth coats here then waited for it to dry before stamping with Konad special polish in black and plate BM211. 


Tonight I'm off to the beach to a sand sculpting festival.  I hope to have picture for you by early next week!

Sunday, July 8, 2012

Sparkly Summer Butterflies

Hi ladies, it's been in ill minute since one of us has posted, hasn't it? Well, Mama was in town for the week of the 4th so we were spending lots of time together. Hopefully you can't fault us for that :)

I wanted to sit down and do some nail art with some pizzazz this weekend, but OF COURSE I didn't know what color I wanted to use or what I wanted to do! So what did I do? Settle for one of my most FAVORITEST colors ever -- Zoya Jacy.

This color just makes me drool. It's vampy and berry all mixed into one and it's formula is awesomesauce and *le sigh* I just love it. Do you have it? No? Go get it. Now!

I used two coats of Jacy and topped with a coat of Revlon Quick Dry. I gotta tell you, I've given up on Seche Vite.  You see, I sat down and did this UBER sparkly mani Friday night... it was a light golden pink shimmer with a few coats of Teenage Dream, and it was AWESOME. But without fail, about ten minutes after I top-coated with SV, I experienced the worst tip shrinkage (giggity) that I've ever had. So I think I'll be giving some love to the other top coats I've neglected during my love affair with SV. Sorry SV, it's been real, it's been fun, but it hasn't been real fun. Peace Out.

ANYWAY! I sponged Zoya Faye on the tips for some nice sparkliezz. Then I used the little butterflies on Konad plate m78 and one of my Sally Hansen Chrome pens. Those things are AWESOME for stamping, and you can get them at the dollar store!

I finished up by adding some little microbeads with the butterflies. I think it looks kinda like a flight path!  Mama also got these at the dollar store during her visit. It's a little pack that comes with 8 colors. Pretty cool! I think they look nice, but boy they sure were a biatch to get on and I doubt they'll stay on long. I'll probably end up picking them off when I get my hands stuck in my hair.

Anyway, here are the pics :)


Hope you all have a great weekend!