Pages

Wednesday, February 29, 2012

Leap Day mani

Happy Leap Day everyone!

I knew I wanted to do some sort of nail art today, but wasn't exactly sure what until I came up with the idea of a frog leaping to a lilly pad.  Amanda is the nail art pro in the family, and I have a whole new respect for her after attempting this nail art.  Wow - it was hard drawing this tiny design and trying to keep my hands steady.  I think in the future I'm gonna leave the nail art to her!

So here is my attempt at nail art.  I used Essie Aruba Blue as a base (my b/f's mom got me this for Christmas this year) and the nail art is all done with acrylic paints and a tiny brush.  Although I am not a big fan of Essie polishes (they always go on streaky for me), the formula on this one was pretty good.  I did have a little staining on removal, so you may want to double up on your base coat.  Also, I need to get an ultra fine sharpy marker because obviously my '29' is not so great.

Have a great Hump Day everyone!


Here is Aruba Blue all by herself


Tuesday, February 28, 2012

Sinful Colors Cinderella faux nad

Surely by now you've read all the hype surrounding this new polish from Sinful Colors.  It's been swatched numerous times on various blogs with differing opinions on whether it's worthy of all the hubbub.

Is it worth it?  In my opinion - yes.  I LOVED this shade.  Originally I was planning Cinderella as the base for a half moon mani, but once I got it on my nails it was so lovely I couldn't bear to cover it up.  So I wore it plain for 2 days before I stamped over it right before removal on day 4.

Cinderella is a soft pale springy blue with something special - a slight pink shimmer!  It really did remind me of the shimmery gown Cinderelly wore to the ball.  I knew it was quite sheer, so I started with white underwear of Sinful Colors Snow Me White.   Then I applied 2 coats of this gorgeous shimmery goodness.  The formula was actually excellent (Sinful is really hit or miss with me on quality).  It went on smooth and even and dried fast. Try as I may I just could not coax that pink shimmer out in my photos - either in sunlight or artificial.  You'll have to trust me on this one, the pink is there!


After Cinderella was fully dry, I applied a top coat of Out the Door.  Now - this is a new topcoat for me.  The sales clerk at Sally's swears she likes it better than SV, because it doesn't thicken up in the bottle.  I bought the large jumbo size bottle at 2.5 ounces (73 ml); which is 5x the size of the SV bottle at almost the same price.  SV = $8-9, OtD = $10.  I am still undecided on the quality of the product and need to do more testing.  Here's why...


After I applied the OtD, I waited a half hour or so then applied Color Club Copycoats scented topcoat in Duplicity (this is the turquoise tinted one).  Approximately 3 hours later, I reached into my makeup drawer and dented my mani in 3 places. I can't tell you whether this is due to the initial topcoat not drying thoroughly (it's suppoed to be super fast dry) or the Copycoats (which is not a fast dry topcoat).  Still - it had been THREE hours.   So I will do an independent test on my next mani of SV vs OtD and let you know the results.  Incidentally, I did not think the fragrance on Duplicity was as strong as the last one I tried (Mimic) and I think so far I like Mimic better.  I could still smell Mimic even after applying a regular fast dry topcoat over it but Duplicity was barely noticeable with nothing over it.

Here's the mani after I stamped over it with plate M64 and Sally Hansen Color Quick pen in Turquoise Chrome.  If you haven't tried these pens yet for stamping - what are you waiting for?  They are awesome for stamping - easy to control with super pigmented opaque color.  I was lucky enough to pick up 6 of them at Dollar Tree for a buck apiece.  In hindsight I wish I'd gotten more!  Oh, and my fubared pinky finger?  That is the result of attempting a plaid stamp with 2 different colors before finally settling on this design instead.  I don't know if I have a faulty stamp on that plaid image or what because it was blurry even using 2 different polishes.  And I'm pretty sure it wasn't my technique.  Anyway- thank God for top coat, although I did bork up a little bit of the cuticle line from removing the 2 botched stamps! If you like the chrome pens for stamping head over to Lyndsey's blog at http://pixiepolish.blogspot.com/ and check out her gorgeous use of this pen!


Monday, February 27, 2012

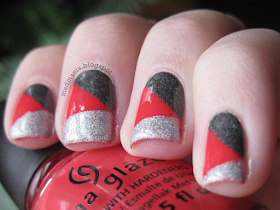
Patchwork Tape Mani with China Glaze Make Some Noise

Hello ladies!

Boo Monday. I can finally join the millions of people all over the world that hate Mondays. Waking up at 6am this morning for work was BRUTAL. Especially when you've gotten to sleep in every day for the past 10 months during your job search. :)

So....sleepy....

I had been wanting to do a patchwork/tape mani for a while now. I don't do them all too often as I'm usually too impatient to wait for all the layers to dry. However, last week I had a lot of free time (I had the whole week off to relax before my big girl job started). I decided it was the day!


I picked up four of the Electropop colors a few weeks ago, and decided I wanted to use one of those. I started with a base of China Glaze Make Some Noise which is a red that leans a bit coral. I added a coat of Seche Vite, waited a few hours, then taped off on a diagonal and painted with Color Club Revvvolution. Waited overnight, then added another diagonal of OPI DS Coronation.  I don't know what it is with tape manis, but I always find myself failing miserably. Other people make them look so easy, I don't get it? I tried my best to get the tape sealed down, but it kept seeping under areas where it wasn't secure enough. Curse the tape mani! Also, on my right hand (luckily) it peeled up the entire base when I went to remove the tape from the third layer. BOOO!! I ended up having to go in with a small brush to fix the areas where the polish leaked under the tape.

Either way, I do like the colors in this, I just don't think tape manis are for me :( If I could actually execute them perfectly (Erika, I'm looking at you!) they'd probably be worth the time, but it's a long process for something that I can never get to come out looking as crisp as I'd like. Ah well, I guess we all have our weaknesses :)


Just another little note -- I might be MIA for a bit while I try to learn how to juggle this full time job and blogging at the same time. In the mean time, Mama will keep you guys entertained with posts, but I imagine I'll be wiped out the first couple of weeks :)

I hope you guys all have a wonderful Monday!

Thursday, February 23, 2012

Orly Passion Fruit fauxnad

Happy Pink Wednesday everyone (this post was supposed to go up yesterday but Amanda and I had a scheduling conflict!  sorry about that!)

I know you're thinking to yourself - that doesn't look pink.  But the camera is playing tricks on your eyes.  May I introduce Orly Passion Fruit, which is a bright neon coral jelly.  It actually looks more pink in the bottle than the nail - once you get it on, it leans a little more orange.

Passion Fruit applied very nicely and dried fast.  I didn't have any issues with streaking, dragging or cuticle pooling.  I initially was going to do 2 coats, but realized I still had VNL so I went ahead and added a third coat.  As I mentioned, Passion Fruit dries with a jelly type finish so I topped it with SV for some shine. 


I decided today was the day I wanted to try out my Color Club Copy Coats scented topcoats.  I used the pink one - named Mimic - because I have read elsewhere that these topcoats; although only slightly tinted, can cause mimimal color shifts in your base color.  I have to say that I really enjoyed the scent of Mimic.  I can't comment on what perfume it smells like, because I'm not a perfume connoisseur, but the company information says it contains blackberry, damask rose and sandalwood.  I was sniffing my nails all evening.   And I love the bottles - little squat square bottles with colored scented goodness in them!


This morning I applied a fauxnad over the base color using plate M72 and a Sally Hansen gold chrome pen.  I love these for stamping - great pigmented color!


What do you think of this fauxnad?  I've been really uninspired lately but I'm really liking this one!

Wednesday, February 22, 2012

Sheep Nails

Hi friends!

Today I have some cute....sheep (?) nail art to show you! I'm not sure what goes through my mind when I'm picking a design to do on my nails... I guess it's something like, *type 'cute' into ShutterStock.* "AHA! Cute sheep picture! Guess that's what I'll do."


Anywho, I started with a base of China Glaze For Audrey. My bottle of this is getting terribly low and difficult to work with. I think it's time to suck it up and buy another one!

The sheep are made with black and white acrylic paint. Pretty simple, really. If you can make blobs with a small paintbrush, you can do this design.


One thing I did notice -- every time I do some kind of nail art that's based around an animal, one of them always looks special! I don't know what it is...maybe my pinky nail is too small to draw much on so they always look slow? I don't know, but it always makes me laugh :D

Also! I have some good news to share with you guys! If you follow me on Twitter, you might've seen me post that.... this blog got me a job! Yeah! It's not anything related to polish, but in the job description they said they wanted people with blogging experience. So during my interview, I talked all about it and what I've learned from it (to two males, so I'm sure they were really interested...haha). My last day at good old Charming Charlie was last night and I start my new digital marketing job on Monday!

Back to the post... I think these sheep came out pretty cute except for the special ones.. haha. Devin's words on this mani were, "Is that cabbage?" Yes. Yes, darling, I painted cabbages on my nails. Really though. I wouldn't put it past me...

I think these nails are... baaahhhaaaaaaaaddd ass. Heh... see what I did there?

Happy hump day!

Friday, February 17, 2012

Junior High Doodles Nails

Hello!

Goofy title for this one, eh? I'm not quite sure where this idea came from, but I do think I've seen some people in the nail blogosphere do something like this before. However, I don't know WHO so if you know who originated this idea, please let me know and I will give credit where credit is due :)

(edit: here's some of the originals! iiamjellyEmerald SparkledVictoria7)


For this one, I started with a base of Sinful Snow Me White -- the ONE color in my collection that's close to being completely empty. And also one of the worst whites in the history of the world. I added a top coat of Seche Vite and drew on all the details with a fine tip Sharpie. BTW -- thanks to those of you that suggested Sharpies for writing text! It was MUCH easier than painting. I definitely suggest it if you're not as nimble with a nail art brush as you'd like to be. One thing I did notice is to wait until your mani is completely dry. I tried to draw the blue lines on my pinky 5-10 minutes after the SV and it ended up squishing/denting it a little bit. I also had to rotate my nail for the blue lines as opposed to just drawing them by moving my other hand. Do you guys get what I"m trying to say?


Anyway, I think these came out pretty cute. I used to draw doodles like this on my notes all the time during school. Sssh, don't tell my professors that I wasn't paying attention :)

Sunday, February 12, 2012

Icing magnetix blue

I'm sure by now you've seen this color swatched on other blogs so I'll say briefly I really like this color and I love the magnet that comes with these polishes - but my brush was SO wonky it almost made me not want to use this.  It was like trying to apply polish with a mop.  Horrible.

I've noticed with magnetic polishes that the design seems to muddy or become less defined after a couple days of wear.  So on this mani, I actually held the magnet over my nail for a full 60 seconds then immediately popped my nail under a nail dryer to try to set the nice crisp design.  And I think it helped!


Incidentally these pics were taken after 3 days so you can see a little bit of tip wear.  But it held up pretty well for an inexpensive polish!  This was 2 coats of color.  No complaints there!

Here is a pic of the brush.  Can you see where the bristles actually TWIST at the end? 


Hope you enjoyed today's post and have a great day everyone!

Saturday, February 11, 2012

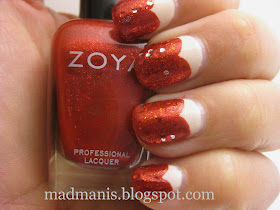
Valentine half moons

I don't know what to call this manicure.  It's not really a half moon because it's shaped like a heart.  Maybe a heart shaped reverse french?  I saw this on Illamasqua's website a long time ago and wanted to recreate it.  Sadly, mine did not come out nearly as pretty as that one.

I started with a base of Orly Pure Porcelain.  PP is sheer, and I needed multiple coats to get it opaque and it's the only off-white shade I own.  Then I used red acrylic paint to draw in the heart shape as a pattern because I was afraid I wouldn't be able to get sharp enough lines with polish without some sort of guideline.  Then I applied Zoya Carrie Ann over the acrylic paint and decided to top it with OPI Excuse Moi.  BTW - Carrie Ann is one of my FAV red polishes - it's a sparkly shimmery red that goes on like a dream.  The glitter from Excuse Moi blends in with the base color of CA so it's not terribly noticeable, and I didn't want to put numerous coats on so I settled for one.

Way too many coats on this one.  I'm waiting for my mani to just fall off from the sheer amount of product on my nails.  It's very Valentine-y and sparkly and I like it; but I'm dreading the day I have to remove it! ;-)


Thursday, February 9, 2012

Bee Mine Nails

Hi ladies! Is anyone getting tired of Valentine's Day manis yet? I know I am... I just want to get back to regular ole manis :P

Quick post today because I have lots to do, but I just wanted to share this one with you!

(Don't mind the randomly placed watermarks... I'm trying to find an unobtrusive way to mark my pictures.)


The base is Essie French Affair (I know I know....I dislike Essie's formula, but I can even get over it for this color because it's just so darn pretty!). I drew the silhouette of the bees first, because I don't have a steady enough hand to draw a black outline last. So, drew the black silhouette first, then added in the white face and wings, and yellow stripes with acrylic paint. I also tried to paint "Bee Mine" on my thumb, but I really need to get some good nail art pens or something because it is REALLY hard to paint text with a nail art brush. Maybe I just need a brush with shorter bristles instead? At any rate, I think it came out pretty cute :)


This one's for my mama, because her name means Honeybee :)

Have a great weekend everybody!

Wednesday, February 8, 2012

Pink Wednesday: A different take on magnetic polish

Hi ladies! Happy hump day! Almost to the weekend, what are your plans? My boyfriend is coming up for the weekend. He is still in school still -- I don't get to see him whenever I want, so I'm pretty excited :)


For this mani, I started with a base of two coats of e.l.f. Fuchsia. Such an original name, man....Fuchsia, for a fuchsia polish. These execs at e.l.f. are so deep and creative. All the other e.l.f. polishes I have are streaky and sheer, so imagine my surprise when this one was opaque in just two coats! The brush was wonky on it, but again... all my e.l.f. polish brushes are wonky and need hair cuts. I don't know why I love this color so much -- it's your regular, run of the mill magenta, fuchsia color. I don't know! I never used to like pinks either... I must be going soft in my old age.

Here are some swatches of Fuchsia by itself:


On day two, I wanted to freshen this mani up. It had gotten dull and I already had tip wear a day later. Mama sent me two Icing magnetics a few days ago that I decided to use on it. When I initially got the package, I played with the magnetics and could NOT get them to work for the life of me. It would only magnetize down the center of my nail. But, when I tried this time, I used thinner coats and it seemed to work a little better. I still need some practice with them though to get a harsher pattern to show up, I think.

Anyway, I just taped down the diagonal of my nails and painted on a coat of this gold magnetic polish from Icing. It has no name. Icing, y u no name awesome polishes?!

Finished up with a black line over top of the diagonals and voila! A simple Pink Wednesday mani that isn't your standard magnetic mani. Mom called it "interesting" ... I guess I can live with that.


Also, just a little note: I've added a requests/submit button on our Tumblr! So if there's any mani ideas, requests, questions, what have you.... send em there! :)

Tuesday, February 7, 2012

Heart Vines Nails

This is a mani I did based off of an image I found on ShutterStock. The image was of various hearts hanging off of a sort of branch or tree.


For this mani, I used a base of Orly Pure Porcelain. Pore Porcelain is a great neutral that's opaque in just two coats. It's a good alternative if you don't want to use a stark white background as a base for a nail art design. It's simple, but it's one of my favorite neutral colors in my stash.

The branches, hearts and dots were all made with black and red acrylic paint (what else?). I really like the end result of this mani and it wasn't too terribly hard to reach it! If you have the patience, this is an easy mani to pull off.


Happy Tuesday, hope you're all having a good day so far :)

Monday, February 6, 2012

Anti Valentines Day Mani

Hi ladies!

Someone on Tumblr suggested that I do some anti-Valentine's Day manis, and I figured I'd oblige because come on, who HASN'T hated Valentine's Day with the fury of 1000 hells at some point in their life? I know I have.


I painted all my nails (except my ring finger) with Wet n Wild Burgundy Frost. On my ring finger, I painted a black base. I then used acrylic paints to draw the lines, "explosion" (I don't know what else to call it?) and broken heart on my ring finger. I also topped all the other nails with OPI Black Shatter.

Now, I've never been into shatter/crackle polishes AT ALL, mind you, but this one seemed to fit. Black Shatter, shattered heart....yeah, my emo side is coming out.  But I digress. Anyway, the ONE time I used this bottle of Black Shatter (I got it in a giveaway) and it's goopy and clumpy. So... I don't know if that's the reason you can hardly see any base color or if I applied too much...but I only used one thin coat. Anyway, what I'm trying to say is I wish the deep red popped out a bit more underneath the Black Shatter. It did come alive a little more with top coat, you should have seen how dull it was before!

I have the whole week off, so hopefully you guys can expect more posts than usual this week! Gotta keep myself occupied somehow ;)

Friday, February 3, 2012

Sally Hansen Feelin' Saucy fauxnad

So this color combination was inspired by my calender today.  It's a picture of a kitten playing with 4 balls of yarn - magenta, yellow, blue and red.  Unusual colors to use together but somehow they just worked! 

I started with a base of Sally Hansen CSM in Feelin' Saucy, which is a gorgeous magenta color.  I don't know why I don't wear this color more often, when I applied it, I really liked it.  My bottle is a tad thin so I had to take care not to flood my cuticles.  It levels well, dries fast and is well pigmented.  I used 2 coats for opacity.

When my base was dry, I lightly sponged Sally Hansen Insta-Dri in Lightening (sic) and Sally Hansen CSM in Right Said Fred and topped with 2 coats of Orly Shine On Crazy Diamond to give it just a touch of a holographic shimmer.  Then I stamped with a geometric pattern from Red Angel plate 114 and Konad special blue polish.  BTW - does anyone have any suggestions for a well pigmented medium blue stamping polish other than Konad?

This design somehow reminds me of the Autobot and Decepticon symbols from Transformers.


And here's a pic of Feelin' Saucy by herself.


Thanks for reading and have a great day!

Wednesday, February 1, 2012

Valentines Cupcakes

Hi all! I have another Valentine's Day Mani for you today.  This one is your run of the mill cupcake design, but I jazzed it up a bit for Valentine's! I wasn't feeling just painting plain hearts today so I decided I wanted to do something cute but still festive. I think this fits that :)


The cupcake liners are done with Zoya Sooki and everything else is acrylic paint. Sooki is one of my very favorite polishes ever....but the smearing is so bad when you take it off. Ughhh.... such a mess.

Happy hump day! :)